Setting Up Scan to Email with Shortcuts on a Sharpmark Copier
A guide to configuring the E-mail Setup page and creating one-tap email shortcuts
Sharpmark copiers (the Lexmark-built Sharp models) use a slightly different web interface than the older Sharp lineup, but the idea is the same: you tell the copier how to talk to your email server, give it credentials, and then create shortcuts so users can fire off a scan with a single tap on the touchscreen.
Step 1: Open the E-mail Setup page
From your browser, type the copier's IP address. Once the web interface loads, navigate toSettings > E-mail > E-mail Setup. This is the page where every important email setting lives.
Step 2: Fill in the SMTP and authentication fields
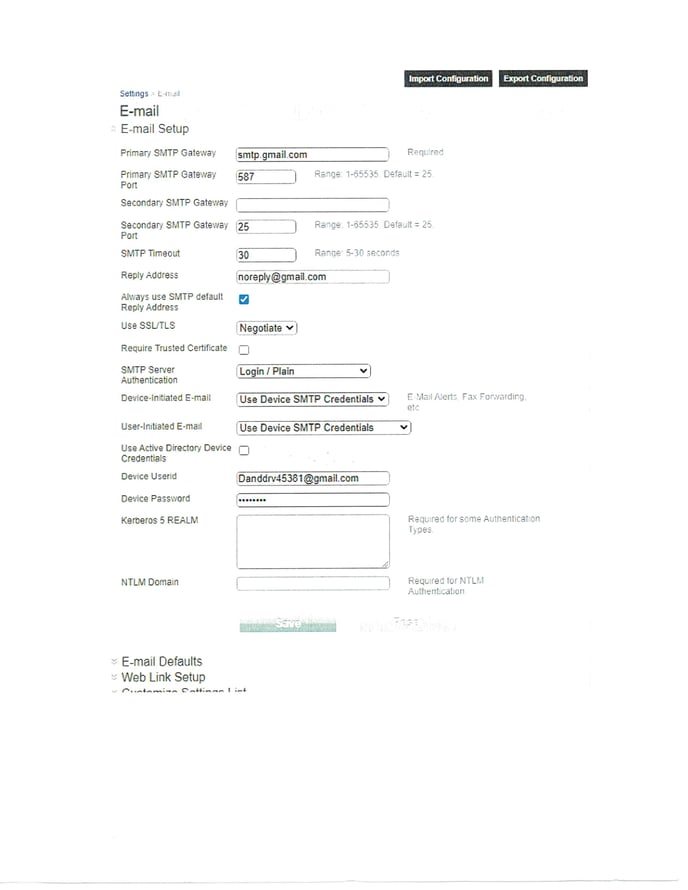
Here's what to enter on the E-mail Setup page if you're using Gmail. For other providers, swap in your provider's SMTP server and port.
Primary SMTP Gateway:smtp.gmail.com
Primary SMTP Gateway Port:587(or 25, depending on your network)
Secondary SMTP Gateway Port:25
SMTP Timeout:30seconds
Reply Address: a no-reply or shared address that recipients should reply to (likenoreply@gmail.comor a shared inbox)
Always use SMTP default Reply Address: check this
Use SSL/TLS: set toNegotiate
SMTP Server Authentication:Login / Plain
Device-Initiated E-mail:Use Device SMTP Credentials(this is what's used for email alerts and fax forwarding)
User-Initiated E-mail:Use Device SMTP Credentials
Device Userid: the Gmail address (for example,Danddrv45381@gmail.com)
Device Password: the 16-digit App Password from Google (not the regular Gmail password)
Once everything is in, clickSaveat the bottom and then clickTestto verify the copier can talk to Gmail.
The full E-mail Setup form with every field that matters.
About App Passwords:if you're using a Gmail account, you'll need to generate a 16-digit App Password from your Google Account's Security settings instead of using your regular Gmail password. Google requires this for any device that sends mail on your behalf. See our separateScan-to-Email Fixpost for the step-by-step.
Step 3: Create a shortcut so users can scan with one tap
Once Scan to Email is working, the next quality-of-life upgrade is creating shortcuts. A shortcut bundles a destination email address and your preferred scan settings into a single icon on the touchscreen, which means scanning to a frequently-used address takes one tap instead of typing.
The Sharpmark touchscreen offers a few ways to use shortcuts:
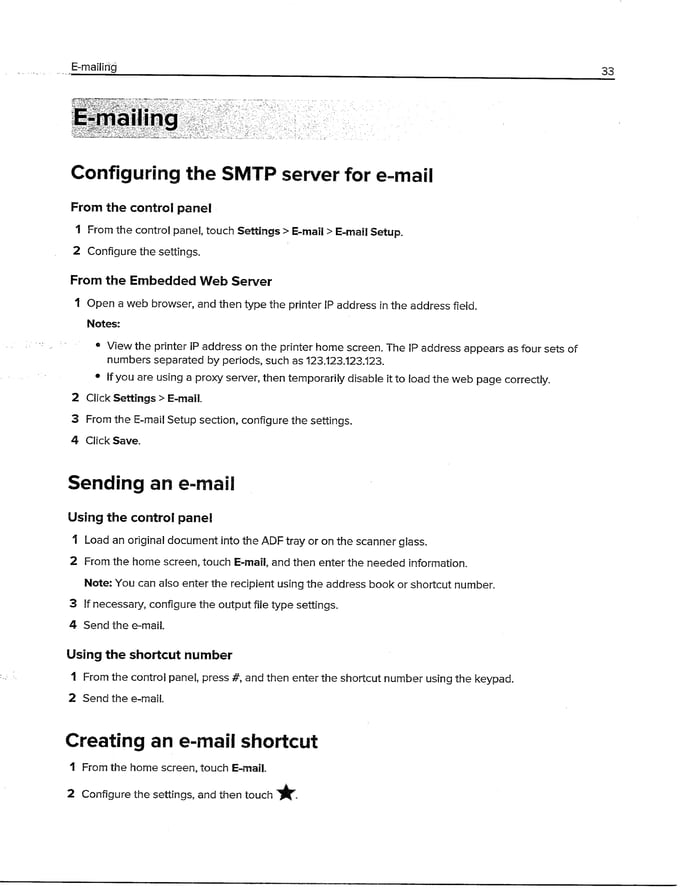
From the home screen, touchE-mail, configure your settings, and then touch thestar iconto save the configuration as a shortcut.
Using a shortcut number: from the control panel, press#followed by the shortcut number you assigned. Hit start and the scan goes out.
Sending a basic e-mail: from the home screen, touchE-mail, enter the recipient (either typed, from the address book, or by shortcut number), configure file type if needed, and send.
The reference page from Sharpmark's own documentation lays it out below.
Sharpmark's own quick-reference for sending email, using shortcut numbers, and creating shortcuts.
That's the workflow
Once the E-mail Setup is saved and a few shortcuts are created, the day-to-day use is fast. Walk up to the copier, load your originals, tap the shortcut, hit Start, and the scan lands in the recipient's inbox.